Adventures in Geometry for Kindergartners (8/25/99)
Prepared by:
Joseph Malkevitch
Mathematics and Computing Department
York College (CUNY)
Jamaica, New York 11451-0001
Email: malkevitch@york.cuny.edu (for additions, suggestions, and corrections)
Phone: 718-262-2550 (2551)
Note for parents:
The projects below are designed for you to do together with your children. Although
the projects involved have been chosen for very young children (kindergartners),
they can be done by older children as well. The goal of the projects is to show both
you and your children some amazing but elementary aspects of geometry. The activities are
described in the pages below, which discuss the materials you will need and give
descriptions of how to carry out the projects. The materials needed are things you
are likely to have around the house: plain white envelopes, scissors, transparent tape, crayons,
etc. You can exercise your own creative talent by using these projects as jumping-off
points for other experiments you may wish to try with your kids. Let me know about any discoveries you make!
Mathematics is sometimes defined as the science which studies patterns. One can look
for patterns involving numbers. This leads to the branch of mathematics which studies
arithmetic (number theory) and algebra. One can also look for patterns involving
shape. This leads to the branch of mathematics called geometry. Among the patterns a modern
geometer might study are the designs one sees in nature or a Scottish plaid. Although
these projects were chosen merely for the enjoyment of discovery, one can see even here the hints of the ways that mathematics studied for intellectual adventure winds
up supporting modern technologies or other applications. Modern work in geometry
has helped make possible CAT scans, cellular phones, fax machines, robotics, CD-Roms,
and the soon-to-arrive HDTV (high definition television).
Enjoy!
Project 1
A surprising shape that can be made using an envelope
Materials: Business or letter size white or colored envelope; scissors.
Project 2
The Cylinder and the Möbius Strip
(Materials: Plain white paper, scissors, crayons, transparent tape.)
Project 3
Designing an efficient route for a snow plow or garbage collection truck
(Materials: Plain white paper, colored pencils.)
Project 1
Goal:
To show how something familiar and simple can be transformed in a
straight-forward way into something unexpected.
(Materials: Business or letter size, white or colored envelope; scissors.)
Instructions:
1. Wet the flap of the envelope and seal it firmly.
2. Shown on page 4 is the schematic of an envelope. Fold the rectangular envelope
(see upper figure) along the diagonal AC and crease the envelope along the resulting
line segment shown in bold in the second half of the diagram firmly. Repeat this
for the other diagonal BD (not shown). (Some kindergartners may have trouble doing this step
and you may have to help them.)
3. If you have done step two properly, the envelope has been divided into four triangular
sections. (See bottom diagram of pg. 5 for a schematic.)
4. Have your child use a scissor to cut out the triangle AEB. (Two layers of paper
will be cut away.)
5. Holding the envelope at corners A and B and flexing it along its bottom, have your
child insert the two layers of paper at A inside the "pocket" at B so that A coincides
with B. This will transform the flat envelope with a triangle cut out into a three-dimensional solid, which is called a tetrahedron! (When the tetrahedron is finished,
you will want to gently crease the line segments joining its corners.) If you unfold
the tetrahedron and restore the flat envelope, you will see a line segment which
joins point E to the mid-point of segment DC. Variation: (starting from a new sealed envelope):
6. Have your child cut out triangle BEC, and create a tetrahedron by inserting corner
B into the "pocket" at corner E.
Remark: If you have a middle school student in your family, have the child think about
how one can understand the surface area of the tetrahedron in terms of the areas
of sheets making up the envelope with a cut-out triangle.

Figure 1

Figure 2
Project 2
Goal:
To understand how surfaces can be built up from simpler objects, and to show that
in three dimensions some unexpected phenomena can occur.
Materials:
1. Plain white paper, crayons, scissors, transparent tape. (8 and 1/2 by 11 paper
is a good size.)
Instructions:
1. Have your child cut from a plain white piece of paper, several equally sized rectangular
strips. (Rectangles about 1 and 1/2 inches by 11 is a good size.)
2. Color one side of one rectangle with a crayon and color the other side of the rectangle
with a different color. Color another rectangular sheet with the same color scheme.
3. Bend one of the rectangles around so that points A and B and points C and D match
up and tape the end segments AB and CD together securely with transparent tape.
If you have done this properly, one side of the surface you get will be colored one
color and the other side with the second color.
Note: This surface is called a cylinder
. You may want to ask your child to find for you objects that are cylinders. Most
cylinders around the house have tops and bottoms, for example, tin cans and salt
cartons. However, paper towel rolls and toilet paper rolls have cardboard cores
which are cylinder shapes that have no top or bottom.
4. Bend another rectangle around so that the points A and B and point C and D line
up; however, before taping the segments AB and CD, give one end a half-twist before
taping the segments together with transparent tape. If you have done this properly,
opposite colors will abut under the tape!
Question: Do you think the two surfaces you have obtained are the same?
In a moment we will show that they are not the same. The second surface is known as
a Möbius strip (or Möbius band). It is named for the 19th century German mathematician
and astronomer, August Möbius.
5. Pick up the cylinder and taking a pair of scissors, start at the point in the middle
of the place where the transparent tape has been placed and cut down the middle of
the surface in a direction making a right angle with the tape until you get back
to where you started. Observe what happens!
6. Pick up the Möbius band and taking a pair of scissors, start at the point in the
middle of the place where the transparent tape has been placed and cut down the middle
of the surface in a direction making a right angle with the tape until you get back
to where you started. Observe what happens!
Comment: If you have done this properly, when the cylinder is cut down the middle,
the result is two new and smaller cylinders. However, when the Möbius band is cut
down the middle the result has only one piece!! The Möbius strip is an example of
what geometers call a one-sided surface
. For the cylinder, if you pick one of its edges and trace around it, you do not "visit"
the other edge of the cylinder. If you start along the edge of the Möbius band and
follow it around, you will come back to the point you started with, having traversed the whole "boundary" of the surface. Various companies have obtained patents on mechanical
devices which take advantage of the one sided nature of the Möbius strip to design
conveyor belts, typewriter ribbon cartridges and computer printer ribbon cartridges, which have better performance characteristics than if the belt or ribbons are
cylinders!

Figure 3
Questions and other experiments:
1. How many half twists does the surface obtained when one cuts down the middle of
a Möbius strip have?
2. Experiment with making Möbius strips with rectangles that have a different length
to width ratio.
3. Instead of cutting the Möbius strip starting in the middle of the taped section,
start the cut about 1/3 of the way along the taped strip, again in a direction perpendicular
(i.e. at right angles) to the tape. When you cut far enough to reach the tape again, continue on past the start of the cut and continue cutting until you reach the
tape again at the point where you started your cut. What kinds of pieces does the
Möbius band decompose into this time?
4. Try experimenting with giving the original rectangle different numbers of 1/2 twists
(e.g. 2,3,...) before taping the segments AB and CD together. What happens when you
cut down the middle of these surfaces?
5. How many boundary edges does the boundary of the cylinder have? (answer: 2, and
the edges form two circles.). How many boundary edges does the boundary of a Möbius
strip have? (answer: 1, and the single edge forms a knot! This can be verified by
cutting very carefully along the edge of the Möbius strip and very close to the edge. One
creates something similar to a knotted piece of string!)
6. Another intriguing property of the Möbius strip is that one can not assign a consistent
sense of "clockwise" and "counterclockwise" on this surface. Thus, the Möbius strip
is called unorientable
. By contrast, the cylinder is orientable.
7. Make two cylinders from rectangles of the same size. Now paste these two cylinders
to each other but at right angles to each other. (The final result looks like two
bracelets at right angles to each other.) Now carefully cut down the middle of the
first cylinder. This splits the surface into two smaller cylinders joined along a rectangle.
It looks a bit like ear-muffs connected by a wire. Now cut down the middle of the
rectangle. Try to guess what you will get when you are done! Answer: A square picture frame!! Repeat this with cylinders pasted at right angles but of different diameters.
Project 3
Goal:
To determine when it is possible to traverse the lines of a geometric diagram in a
particular way.
Materials:
Some sheets of plain white paper.
Instructions:
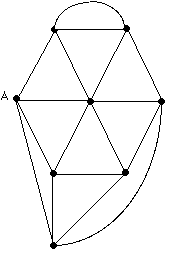
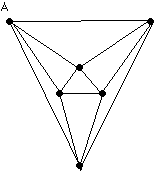
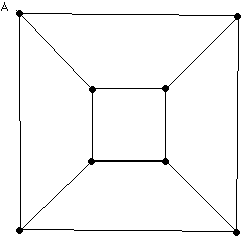
1. Copy or have your child copy the diagrams shown on page 10 and 11 onto a plain
piece of white paper. (You can create your own similar diagrams.)
2. For each of the geometric figures on page 10 and 11 (geometers refer to such diagrams
as graphs)
have your child determine if it is possible to put one's pencil down at the point
labeled A (the dark dots are usually called vertices
) and, moving along the line segments (usually called edges
) without lifting the pencil off the paper
traverse each line once and only once
and return to A. (Remark: A tour through a graph which starts and returns to a fixed vertex A and
traverses each line segment once and only once is known as an Euler cycle
, in honor of the great 18th century Swiss mathematician Leonard Euler. The word "cycle"
is used because it connotes coming back to where one started.)
3. Create some diagrams of this kind of your own, label one of the vertices A and
try to carry out the instructions in 2.
4. Can your child determine a simple rule which enables one to tell if it is possible
to accomplish the task or not? (Hint: Count the number of line segments which meet
at each vertex!)
Remark: You can explain to very young children that the numbers they count with can
be grouped as: E: 2, 4, 6, ... or O: 1,3,5,7, ... (i.e. alternating numbers go
alternately into E or O). Adults call these groups the even and odd numbers.
Application:
Graphs which have Eulerian cycles will allow snow plows, street sweepers, or garbage
collection trucks to follow routes which are very efficient. Using modifications
of the concept of an Euler Cycle mathematicians can help design efficient routes
for graphs which have no Eulerian Cycles, which is, not surprisingly, much more common. (In
the general case, the goal is to find a route which repeats as few sections as possible
where, in the case of a snowplow, the snow has already been removed by the plow earlier in its work.) When a graph has an Euler Cycle no repeats are necessary.

Figure 4

Figure 5

Figure 6

Figure 7
What Euler showed in 1736 was that if a graph (i.e. diagram with dots and lines) consists
of one piece, then it has an Euler Cycle if and only if every line vertex (dot) has
an even number of line segments at it.
Return to Joseph Malkevitch's Home Page


